
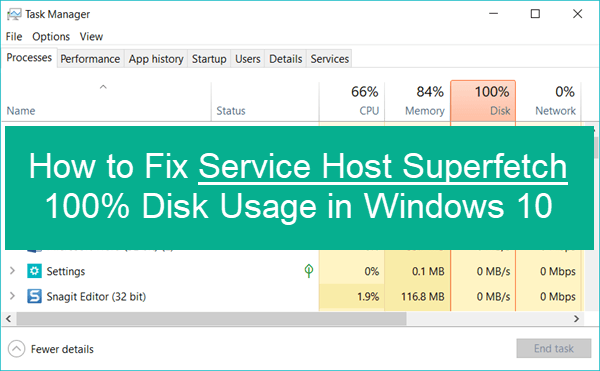
Most of the windows users are complaining of slowing down their pc and also noticed the 100% disk usage of the service called Superfetch. Clients have reported that sometimes they have faced high disk usage problems because of “Service Host: Superfetch” taking up memory in the Task Manager. So, If it happens to be one of you, here are the solutions that you need to know about SuperFetch.
What Is Service Host SuperFetch and what does it do?
Service Host SuperFetch is a process that improves Window’s hard disk performance. The formal description of Service Host SuperFetch says that it maintain and improve the applications’ time. This technology allows Windows OS to manage random memory so that your apps can easily perform efficiently. It helps third-party applications and critical Windows components to perform quickly common tasks.
If you have a computer, you can easily see “Service Host: SuperFetch” in Windows Task Manager. But sometimes in Windows 10, you find that Service Host: Local System is taking much of your CPU, Disk or Memory usage, you’re not alone. Many Windows customers are reporting this situation as well. But it’s possible to fix it.
How to Fix Service Host SuperFetch and disable it?
#1. Close the Superfetch and Fix Service Host: Local System High Disk Usage
The process of how to stop this service is given step by step:
Firstly, Deactivate Superfetch using the run command
- Press on keyboard Windows + R and type “services.msc” command.
- Then search “Superfetch”.
- Edit Superfetch clicking on the property.
- Click “Stop” from stopping the service.
- Superfetch to be Disabled and then click OK
You can also use the second method.
Secondly, deactivate Superfetch using command prompt
- Press Win and search for cmd, press right-clicks on the mouse and select Run as administrator then click “Yes”.
- Type “net.exe” to stop Superfetch and press enter.

- Wait to see if changes can be seen in the computer’s performance. Check if the trouble is resolved.
Another step is given below,
- In the popup window, find the Superfetch and click.
- Then Startup type to Disabled. And change the Service status to Stopped.
- Click Apply then OK to confirm the changes.

When you completed all steps, you can reboot your computer to check whether the issue service host local system high disk is solved.
You can also use the fourth method.
In this fourth part, you can try to disable the Background Intelligent Transfer Service by following some steps,
- Press Windows + R key together to open the Run
- Type msconfig in the box and press enter.
- After that in the System Configuration window, move to Services tab.
- Find out the Background Intelligent Transfer Service option and unchecked it.
- Click Apply then OK to confirm the changes.
Then restart your computer to check whether the issue service host high CPU is solved.
Lastly, if none of the above solutions is effective, you can upgrade your CPU. The CPU which is called the Central Processing Unit is an essential part of the computer. The issue service host local system high disk may be caused by the old CPU. So, if you are facing these issues, you can try to upgrade it. You can also clear up junk files to optimize your computer program.
Fixes for 100% disk usage on Windows 10
Recently this problem has become more common among Windows 10 users. Some typical signs of this problem include an obvious slowdown in the performance. So, we will show you 5 ways to fix a 100% disk usage on Windows 10.
Process 1: Restart the System
Sometimes restarting a computer can fix all kinds of issues. Your Windows 10 100% disk usage problem is no special case.

Be sure to use the “Restart” which begins your system in a new state instead of the “Shut Down” alternative which preserves your system state and may not resolve your disk issue.
Process 2: Upgrade Windows
The latest updates installation can often solve various problems with your Windows 10 system. If you are not up to date then check into the “Update and security” section of the Windows Settings app.
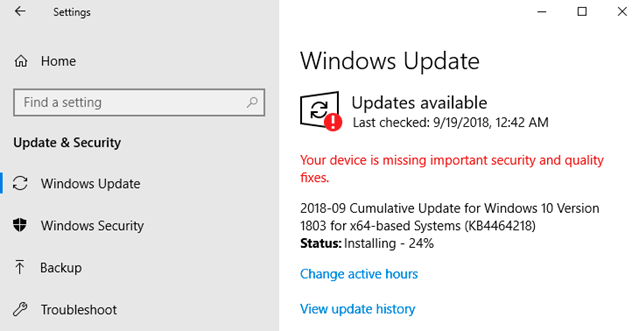
You can check for new updates and install them if they are available.
Settings > Update & Security settings > Windows Update
This may update the overall performance of your system including that of your hard drive.
Process 3: Temporarily Turn Off Antivirus Software
Windows 10 100% disk usage is another process to take when investigating the reason behind the issue is to turn off your antivirus software for a moment. Check to see if this improves your disk usage. If it does, you might need to consider changing antivirus packages. Even Windows Defender can create various problems by increasing I/O and network usage which might lead to high disk usage.
Process 4: Run Check Disk
A check disk can show you if there are any physical issues with your hard drive. Normally, a high disk usage indicates that there is an application or logical issue driving the disk usage, but it is worth your time to rule out any physical damage. Run check disk and note its outcomes.
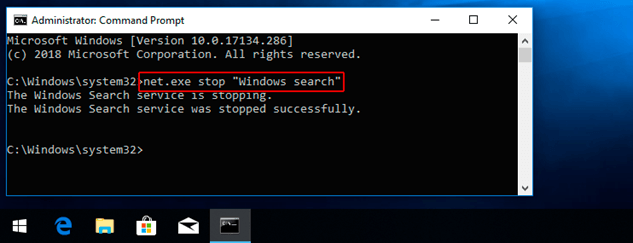
Process 5: Disable Windows Search
A known issue in Windows 8 and 10 can cause a search loop that can be the cause of your high disk usage. To stop the Windows Search facility temporarily and see if it upgrades your disk issue, open an admin prompt and enter the command: net.exe stop “Windows search”. This will stop the search from running until the next time Windows is restarted.
If it turns out that Windows Search was responsible for your disk usage reaching 100%, you can disable it permanently by following this procedure:
- Press Windows key and R together, enter services.msc and press Enter.
- Select the Windows Search and double-click it to update its properties.
- Select Disabled under Startup type and then OK to save.
Finally, Superfetch service is one of the most beneficial services that run on our Windows system. Because of this service we are able to quickly open regularly used applications and other important data that makes the overall experience even faster.
FAQ
- Is it secure to deactivate service host superfetch?
Ans: You may want to disable Service Host Superfetch when you notice that it takes high disk usage. But disabling this service won’t cause system instability. However, you may feel some problems when accessing commonly-used apps that will load faster when it is enabled.
- Why do we need superfetch?
Ans: We need Superfetch because it is a windows service that is intended to build your applications launch swiftly and improve your system speed.
- How do I reduce 100 disk usage?
Ans: 5 Ways to Fix a 100% Disk Usage
- Restart Full System.
- Update Windows.
- Check For Malware.
- Disable Windows Search.
- Stop the Superfetch Service.
- Why your computer so slow?
Ans: The most known reasons for a slow computer are lots of programs running in the background. To see what programs are running and how much CPU and memory they are eating, you can open Task Manager.
- Is service host a virus?
Ans: It’s possible that a virus has replaced the service host of its own. If the file is stored in your Windows\System32 folder, then you can be fairly certain you are not dealing with a virus.
However, it is also most important to think that regularly facing this problem can mean something more than RAM lack of memory or hardware. So, you should thoroughly check by taking professional help.